
So, you're thinking about growing your own tomato plants from seeds indoors? That's a fantastic idea! It's a really rewarding way to get a head start on the gardening season, even when it's still chilly outside. You get to watch those tiny seeds transform into strong, healthy plants right in your own home. This guide will walk you through everything you need to know, from picking out the best seeds to making sure your little tomato plants get all the light and water they need. It’s not as complicated as it might sound, and the payoff is pretty great.
Key Takeaways
- Choose tomato seeds that are suited for starting indoors to give them a head start on the growing season.
- Set up a dedicated indoor space with the right light and temperature for your young tomato plants.
- Always use a quality seed-starting mix, not regular garden dirt, to help prevent issues.
- Water your tomato seedlings carefully, keeping the soil moist but not waterlogged.
- Gradually get your tomato plants used to outdoor conditions before moving them to the garden.
Choosing the Right Seeds for Indoor Success
Starting seeds indoors is a fantastic way to get a jump on the growing season, and picking the right seeds is the first big step to making it a success. It’s like choosing your adventure buddies – you want ones that are up for the journey! Tomatoes, peppers, and eggplants are usually great choices because they need a longer time to grow and mature, so starting them inside gives them a real advantage. Think of it as giving them a warm, cozy head start before the outdoor weather is even close to being ready.
Understanding Seed Packet Secrets
Seed packets are like little instruction manuals for your plants, and they’re full of super helpful information. Don't just toss them aside! Take a peek and look for details like the germination rate, which tells you how likely the seeds are to sprout. Also, check the "days to maturity" to get an idea of how long it’ll take for your plants to be ready to harvest. Knowing the planting dates and whether the plant prefers full sun or partial shade will help you figure out the best spot for your seedlings once they start growing. It’s all about setting them up for success from the very beginning.
Best Plants to Start Indoors
When you’re just starting out, it’s smart to pick plants that are known to be a bit more forgiving and do well with indoor starts. Besides the heat-lovers like tomatoes and peppers, consider herbs like basil, parsley, and oregano. They’re usually pretty easy to grow and give you fresh flavors right in your kitchen. Even some flowers, like marigolds and zinnias, can be started indoors to add some early color to your life. The key is to choose plants that match the light and space you have available indoors.
Heirloom vs. Hybrid Seeds
When you’re browsing, you’ll notice seeds are often labeled as either "heirloom" or "hybrid." Heirloom seeds are older varieties, passed down through generations, and they often have unique flavors and colors. Plus, you can save seeds from heirloom plants to grow next year, and they’ll come back true to type. Hybrid seeds, on the other hand, are created by cross-pollinating two different parent plants to get specific traits, like disease resistance or higher yields. While they can be great performers, seeds saved from hybrid plants might not grow into the same kind of plant. For most home gardeners, either type works well, but it’s good to know the difference!
Choosing the right seeds is like picking the right ingredients for a recipe. Start with good quality seeds, and you’re already halfway to a delicious harvest. Don't be afraid to try a few different types to see what works best for you and your growing space.
Setting Up Your Indoor Seed-Starting Station
Alright, let's get your indoor seed-starting station ready to roll! This is where the magic happens, where tiny seeds transform into vibrant plants. It's not as complicated as it sounds, I promise. With a little planning, you'll have a setup that's perfect for nurturing your seedlings.
Essential Tools and Supplies You’ll Need
Okay, first things first, you gotta gather your gear. Think of it like prepping for a fun science experiment, but with plants! Having the right stuff makes a huge difference. Here's what you'll need:
- Seed trays or containers: You can use anything from fancy seed trays to recycled yogurt cups. Just make sure they have drainage holes! Nobody likes soggy roots.
- Seed starting mix: This is super important. Don't use regular garden soil; it's too heavy. Get a seed-starting mix that's light and fluffy. It helps prevent diseases too. You can find effective seed starting kits that have everything you need.
- Grow lights: Unless you have a super sunny window, you'll probably need grow lights. They give your seedlings the light they need to grow strong and not get all leggy.
- Heat mat (optional): These are great if your house is chilly. They help keep the soil warm, which speeds up germination. My cat loves to sleep on mine!
- Spray bottle: For gentle watering. You don't want to blast your tiny seedlings with a hose!
- Labels: Trust me, you'll forget what you planted where. Label everything!
Selecting Containers and Trays
Choosing the right containers is like picking out a comfy bed for your little plant babies. You want something that's just the right size and shape. Here are a few things to keep in mind:
- Size Matters: For most seeds, individual cells or small pots work great. If you're starting something that gets big quickly, like tomatoes, go for something a bit larger.
- Drainage is Key: I can't stress this enough. Make sure your containers have drainage holes. Otherwise, your seedlings will drown.
- Recycle and Reuse: Get creative! You can use old yogurt cups, plastic containers, whatever you have lying around. Just clean them out first.
- Consider Peat Pots: These are cool because you can plant the whole pot directly into the ground when it's time to transplant. No root disturbance!
Preparing the Seed-Starting Mix
Your seed-starting mix is like the foundation of your whole operation. You want to make sure it's just right. Here's how to get it ready:
- Moisten it First: Before you put the mix in your containers, wet it down. You want it to be damp, but not soaking wet. Like a wrung-out sponge.
- Don't Pack it Down: Gently fill your containers with the moistened mix. Don't pack it down too hard, or it will be difficult for the roots to grow.
- Use a Sterile Mix: This helps prevent diseases that can kill your seedlings. You can buy a pre-made sterile mix, or you can sterilize your own by baking it in the oven.
Setting up your indoor seed station might feel like a lot, but once you have everything in place, it becomes a breeze. The right environment ensures your seeds get the best start possible. For more innovative indoor gardening ideas, consider using repurposed materials to create a stable structure for your grow lights, ensuring optimal conditions for seed germination. shelving unit
Providing the Perfect Growing Environment
Lighting Your Seedlings
Seedlings are like tiny sun-worshippers; they need a lot of light to grow strong and avoid getting all spindly and weak, which we call ‘leggy'. If you don't have a super sunny south-facing window that gets at least 12-16 hours of direct light, you'll definitely want to look into grow lights. You don't need anything super fancy or expensive, though. Regular fluorescent shop lights work just fine! The key is to keep the lights close to your seedlings, about 2-4 inches above them. As they grow taller, you'll need to adjust the lights upwards. Using a timer is a lifesaver, ensuring your plants get consistent light without you having to remember to turn them on and off every single day.
Temperature and Humidity Tips
Most seeds are happiest germinating in a warm environment, around 70-75°F. If your home tends to be on the cooler side, a heat mat placed under your seed trays can make a big difference. Once your seedlings have sprouted and are actively growing, you can actually lower the temperature a bit, aiming for cooler temps (like 65°F during the day and even cooler at night) to encourage sturdy, compact growth. High humidity is great for germination, but once those little sprouts pop up, you'll want to reduce humidity and encourage some air circulation. This helps prevent fungal diseases and makes for stronger stems. A simple plastic dome or even plastic wrap over the trays can help maintain humidity during germination, but remember to vent it regularly once seedlings appear.
Watering Wisely
Watering is one of those things that seems simple, but it's super important to get right for your tiny seedlings. Overwatering is a common mistake and can lead to root rot or ‘damping off,' where the stem collapses. You want to keep the soil consistently moist, but not soggy. Think of it like a wrung-out sponge – damp, but not dripping. A gentle watering can with a fine spout or even bottom watering (setting the trays in a shallow pan of water and letting the soil soak it up from below) works well. If you're unsure, just stick your finger about an inch into the soil; if it feels dry, it's time to water. Remember, it's better to water a little too little than a little too much when they're this small.
The goal is to create a stable environment where your seedlings can develop strong roots and sturdy stems, setting them up for a successful transition outdoors.
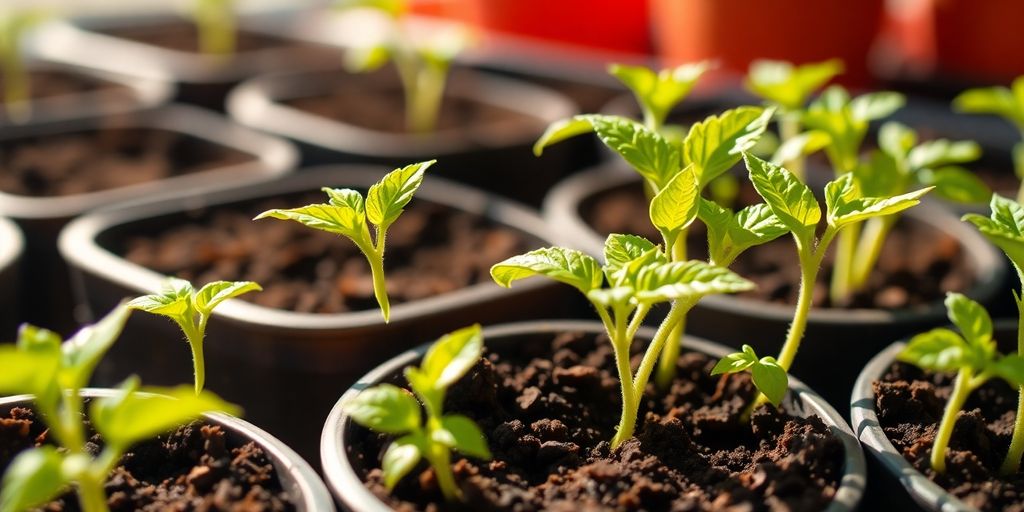
Nurturing Your Young Tomato Plants
Now that your little tomato sprouts are getting bigger, it's time to give them the attention they deserve to grow into strong, healthy plants. It's really satisfying to see them progress from tiny seeds to something you can actually handle!
Dealing with Leggy Seedlings
If your seedlings are stretching tall and thin, looking a bit like spaghetti, they're probably telling you they need more light. This is a super common issue, but totally fixable! The best way to deal with leggy seedlings is to provide more light. If you're using a windowsill, try to rotate the plants daily so they don't lean too much. Better yet, consider getting a grow light. You want to keep the light source just a few inches above the tops of the plants. If they're already leggy, you can sometimes help them by planting them deeper when you pot them up later. Tomatoes are neat because they can grow roots all along their stems, so burying a good portion of that weak stem can actually make the plant stronger.
When to Pot Up Your Plants
So, when do you move your seedlings into bigger pots? You're looking for a couple of signs. First, check for those "true leaves" – these are the second set of leaves that appear, looking different from the initial round "seed leaves." Once your seedlings have a couple of sets of true leaves and are starting to look a bit crowded in their starter cells or small pots, it's time for an upgrade. Gently tease them apart by their leaves (never the stem!) and move them into pots that are about 3-4 inches in size. This gives their roots more room to spread out and grow strong.
Feeding Your Growing Seedlings
Your young tomato plants are going to start needing some food as they grow. They're still using the energy from the seed at first, but once they have a few sets of true leaves, it's a good time to start a gentle feeding routine. You don't need to go crazy with fertilizer; a little bit goes a long way. A balanced, water-soluble fertilizer diluted to half-strength is usually a good bet. Feed them about every two weeks. Watch your plants for signals – if the leaves start looking a bit pale or growth slows down, that's a hint they might appreciate a snack. Remember, it's better to underfeed than overfeed at this stage.
It's really important to remember that tomatoes have a unique ability to grow roots along their stems. This is a fantastic trait that can help you rescue leggy seedlings or create stronger plants overall. When you pot them up or eventually transplant them outside, don't be afraid to plant them deeper than they were in their starter pots, burying a good portion of the stem. This encourages a more robust root system, which is key for a healthy and productive plant.
Make sure your seedlings are getting enough light. If they look like they're stretching for the sky, they probably need more. A good rule of thumb is to provide 12 to 16 hours of artificial light daily to mimic natural sunlight and keep them sturdy.
Preparing Your Seedlings for the Outdoors
Alright, your little tomato seedlings have been growing strong indoors, and now it's time to get them ready for the big wide world outside! This is a super important step, and it's called ‘hardening off.' Think of it as a gentle introduction to the elements – the sun, the wind, and the temperature changes they'll face once they're planted in the garden. Skipping this can really shock your plants, leading to wilting or even damage. We want them tough, but not traumatized!
The Importance of Hardening Off
Hardening off is basically a gradual acclimation process. Your seedlings have been living in a pretty stable environment indoors, so they need time to adjust to the harsher realities of the outdoors. This process helps them develop thicker cell walls and tougher leaves, making them more resilient. It’s like sending them to a gentle boot camp before they graduate to the garden. This step is key to preventing transplant shock and ensuring they continue to grow strong once they're in their permanent home. It usually takes about a week to ten days to get them fully ready.
Here’s a simple way to approach it:
- Day 1-2: Place your seedlings in a sheltered, shady spot outdoors for just a couple of hours. A covered porch or a spot under a larger plant works well.
- Day 3-4: Gradually increase their outdoor time and start exposing them to a little bit of direct sunlight for short periods.
- Day 5-7: Continue increasing their time outdoors and introduce them to more direct sun and gentle breezes. If it’s windy, keep them in a more protected area.
- Day 8-10: They should be able to stay outside all day, but still bring them in at night if temperatures are expected to drop below 50°F.
Always keep an eye on the weather. If a storm is brewing or it gets unexpectedly cold, bring your seedlings back inside to keep them safe. It’s better to be cautious!
Timing Your Transplant Perfectly
So, when is the actual moment to move them into the garden? You've done the hardening off, and your plants look sturdy. The biggest clue is the weather. You want to wait until all danger of frost has passed in your area. Tomatoes, especially, are heat-lovers and can be damaged by even a light frost. A good rule of thumb is to check your local last frost date. Aim to transplant on a cloudy day or in the late afternoon. This reduces the stress on the plants as they settle into their new environment. The soil should also feel warm to the touch, not cold and soggy. If you’re unsure, it’s always better to wait a few extra days. Your patience will be rewarded with happy, healthy tomato plants!
Troubleshooting Common Seed Starting Issues
Even the most seasoned gardeners hit a few bumps in the road when starting seeds indoors. Don't you worry, though! It's all part of the learning curve, and usually, these little hiccups are pretty easy to fix. Let's look at some common issues and how to get your seedlings back on track.
What If My Seeds Don't Germinate?
This is probably the most common worry. You’ve done everything right, but nothing’s happening. First off, check your seed packet – maybe they just take a bit longer than you thought. Also, make sure the soil temperature was warm enough; most seeds need that cozy warmth to wake up. If you planted more than one seed per cell, and nothing has sprouted after a week or two, it might be time to try again with fresh seeds, making sure to keep them consistently moist and warm. Sometimes, seeds are just old or weren't viable to begin with, and that's okay! It happens to everyone.
Dealing with Pests and Diseases
Tiny plants can attract tiny pests, like fungus gnats or aphids. Fungus gnats usually show up if the soil stays too wet for too long. The best defense is to let the top layer of soil dry out a bit between waterings and make sure you're not overwatering. If you see aphids, a gentle spray of soapy water can often do the trick. For diseases, especially that dreaded
Happy Planting!
So there you have it! You've learned how to take those tiny seeds and turn them into strong, healthy tomato plants right in your own home. It’s pretty cool, right? Watching them sprout and grow is such a neat feeling, and it sets you up for a fantastic harvest later on. Don't worry if every single seed doesn't sprout or if a plant gets a little leggy – that's all part of the learning process. Just keep at it, enjoy the journey, and soon you'll be enjoying the taste of your very own homegrown tomatoes. Happy gardening!
Frequently Asked Questions
What are the easiest plants to start growing indoors for beginners?
For beginners, it's best to start with plants that grow quickly and don't need too much fuss, like lettuce, radishes, or herbs such as basil and mint. Tomatoes and peppers are also good choices because they need a longer time to grow, so starting them inside gives them a great head start.
How much light do my indoor seedlings need to grow well?
Your young plants need about 12 to 16 hours of light each day. A sunny window that faces south can work, but if your home doesn't get enough natural light, using special grow lights is a really good idea to keep them strong and healthy.
When should I start my seeds indoors?
The best time to start seeds indoors is usually about 6 to 8 weeks before the last expected frost in your area. You can find this information on seed packets or by looking up your local frost dates online. Starting too early can make plants too big for their pots before it's time to move them outside.
How do I know when and how much to water my seedlings?
You should water your seedlings when the top inch of soil feels dry to the touch. It's important not to give them too much water, as this can cause problems like root rot. A spray bottle or a watering can with a gentle spout works well.
What should I do if my seeds don't sprout?
If your seeds don't sprout, don't worry! It could be because the seeds are old, the soil wasn't kept moist enough, or the temperature wasn't right. Try using fresh seeds, making sure the soil stays consistently damp, and keeping them in a warm spot.
My seedlings are tall and thin, what's wrong and how can I fix it?
Leggy seedlings, which are tall and thin with weak stems, usually happen because they aren't getting enough light. To fix this, move them closer to your light source (like a grow light or a sunny window) and make sure they get 12-16 hours of light daily. You can also plant them a bit deeper when you move them to a bigger pot, which helps support the stem.