
Ever wanted to grow your own plants but thought you needed a huge backyard? Think again! Starting easy plants to grow from seeds indoors is a super fun way to get your green thumb working, even if you live in a small apartment. It’s pretty cool to watch tiny seeds turn into thriving plants right in your home. Plus, you get to pick exactly what you want to grow, which is way better than just buying whatever’s at the store. This guide will walk you through everything you need to know to get started, so you can enjoy fresh herbs, veggies, or flowers, no matter the weather outside.
Key Takeaways
- Starting seeds inside gives you a big head start on the growing season, especially for plants that take a while to mature.
- Using a special seed-starting mix, not regular garden dirt, helps prevent diseases and makes seeds sprout better.
- Having the right light and temperature is super important for healthy little plants.
- Thinning out your seedlings makes sure the remaining plants get stronger and grow better.
- Hardening off your seedlings before planting them outside helps them get used to the outdoor world.
Why Starting Your Garden Seeds Indoors Is a Game-Changer
Starting seeds indoors? It's totally a game-changer! Seriously, if you're even a little bit serious about gardening, you gotta give it a shot. It might seem like a lot of work at first, but trust me, the payoff is huge. You'll be harvesting veggies way before your neighbors, and you'll have way more control over what you grow. Plus, it's just plain fun to watch those little seeds pop and grow into something amazing. Let's get into why this is such a great idea.
Get a Head Start on the Growing Season
Okay, so picture this: it's still freezing outside, maybe even snowing, but inside your cozy home, you've got tiny tomato plants already growing. That's the magic of starting seeds indoors! You're not waiting around for the last frost; you're getting a jump start. This is especially awesome if you live in a place with a short growing season. Think of all the extra tomatoes you can grow!
Save Money with Seed Packets
Let's face it—buying fully grown plants at the nursery can get expensive. A single seed packet, on the other hand, can cost just a few bucks and contain hundreds of seeds. That means you can grow way more plants for a fraction of the cost. Over time, the savings add up, especially if you're growing a large garden. And hey, if a few seeds don't sprout, it's no big deal—you've got plenty more where that came from.
Unlock a World of Plant Varieties
Tired of the same old veggies at the grocery store? Starting seeds indoors lets you grow all sorts of cool and unusual plants that you might not find anywhere else. Want purple peppers? No problem. How about striped tomatoes? You got it! The possibilities are endless. You're not limited to what the local nursery carries; you can grow whatever your heart desires. It's like having your own personal plant boutique.
Indoor seed starting gives you control, saves money, and opens up a world of possibilities for your garden. It’s a small investment of time and effort that pays off big when your garden is thriving.
Choosing the Right Seeds for Indoor Success
Okay, so you're ready to dive into starting seeds indoors? That's fantastic! It's a super rewarding way to get a jump start on the growing season and have some green around even when it's cold outside. But before you just grab any old seed packet, let's talk about picking the right seeds for indoor success. It's not as hard as it sounds, I promise!
Understanding Seed Packets
Seed packets are like little treasure maps, seriously! They're packed with all sorts of information that can help you succeed. Always take a moment to read the information on the packet before you start planting. You'll find things like how deep to plant the seeds, how long they'll take to sprout, and even when they're ready to be moved to a bigger pot or outside if you plan to transplant them later. Knowing these details can make a big difference in your success.
Here's what to look for:
- Germination time: This tells you how long it takes for the seed to sprout.
- Planting depth: How deep to bury the seed in the soil.
- Spacing: How far apart to plant seeds or seedlings.
- Days to maturity: How long until you can harvest your veggies.
Reading these details can make or break your indoor planting success. So, take a moment to understand the info on the packet before you get started.
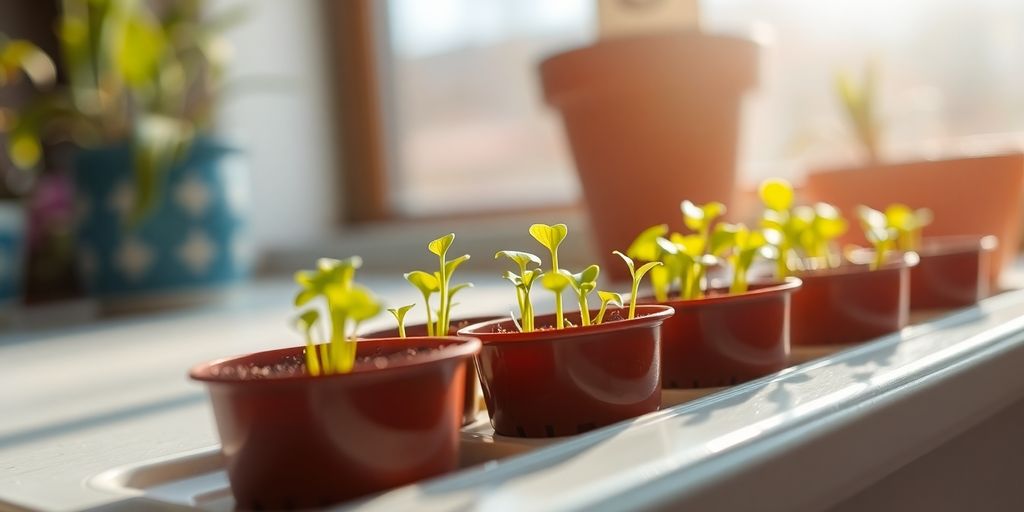
Best Easy Plants to Grow from Seeds Indoors
Starting seeds indoors can feel like a science experiment, but picking the right plants makes all the difference. Tomatoes, peppers, and eggplants are some of the easiest seeds to grow inside because they take a while to mature. By the time spring rolls around, you’ll have strong, ready-to-go plants. Other great options include lettuce, basil, and even flowers like marigolds and zinnias. If you’re new to this, stick with plants that thrive indoors to keep things simple.
How to Spot Quality Seeds
Not all seeds are created equal. Look for seed packets with clear labeling, including germination rates and expiration dates. Organic seeds are a good choice if you’re growing organically, but regular seeds work just as well for most gardeners. If the seeds look damaged or old, skip them—they probably won’t grow well. For the best results, invest in seeds from a trusted supplier.
Here are a few things to look for:
- Check the expiration date: Seeds don't last forever. Make sure they're still good!
- Look for high germination rates: As mentioned earlier, this is a good indicator of seed quality.
- Buy from reputable sources: Stick to well-known seed companies or local nurseries that you trust.
Setting Up Your Indoor Seed-Starting Space
Essential Tools and Supplies You’ll Need
Okay, so you're ready to create a cozy little home for your future plants! It's not as daunting as it sounds. Think of it as setting up a mini-farm, but indoors. You don't need a ton of space or super fancy equipment, just a little planning and some key items to get started. Let's get to it!
Alright, let's gather the essentials. First, you'll need your seeds, obviously! Then, you'll need a growing medium. Don't skimp on quality here—it really makes a difference. Here's a quick list:
- Seed starting mix: This is different from regular potting soil. It's lighter and helps those tiny roots get going.
- Seed trays or small pots: You can even use recycled containers like yogurt cups, just make sure they have drainage holes.
- Labels or markers: Trust me, you’ll forget which seeds are which without them.
- A spray bottle or watering can: For gentle watering.
- Heat mat: This helps keep the soil warm, which is super helpful for germination.
- Grow lights: These mimic sunlight and can be adjusted to hang just a few inches above the plants. This way, your seedlings grow strong and don't get leggy.
Having the right tools and materials can make all the difference in your gardening journey. With these essentials, you're setting yourself up for success right from the start!
Finding the Perfect Spot for Your Seedlings
Finding the right spot for your seedlings is like finding the perfect sunny nook for a cat – it makes all the difference! Ideally, you want a location that gets plenty of light. A south-facing window is usually your best bet, but if you don't have one, don't sweat it. That's where grow lights come in handy. You can set them up pretty much anywhere, like a spare room, a corner of your basement, or even just a shelf in your living room. Just make sure it's a spot where you can easily keep an eye on your little green babies.
- Consider temperature: Seedlings prefer a consistent temperature, ideally between 65-75°F (18-24°C).
- Avoid drafts: Keep your seedlings away from drafty windows or doors.
- Easy access to water: Make sure your spot is close to a water source for easy watering.
Creating the Ideal Environment
Creating the ideal environment for your seedlings is all about mimicking the perfect spring day. Think warmth, moisture, and plenty of light. You've already got the light covered with your sunny window or grow lights, but what about the other stuff? A humidity dome or plastic wrap can help keep the moisture in, especially when the seeds are first starting to sprout. And that heat mat? It's not just for germination; it can also help keep the soil at a consistent temperature, which is crucial for healthy growth. Don't forget to keep an eye on the humidity levels, too. You don't want things to get too soggy, or you might end up with mold or other problems.
- Use a humidity dome or plastic wrap to retain moisture.
- Maintain consistent soil temperature with a heat mat.
- Ensure good air circulation to prevent mold and disease.
Nurturing Your Tiny Seedlings to Thriving Plants
Watering Wisdom for Happy Sprouts
Watering seems simple, but it's easy to overdo it or underdo it! The goal is to keep the soil consistently moist, but not soggy. Think of a wrung-out sponge. Here's how to nail it:
- Use a spray bottle: Gently mist the soil surface to avoid disturbing the delicate seedlings.
- Water from the bottom: Place your seed trays in a shallow dish of water, allowing the soil to soak it up from the bottom. This encourages root growth.
- Check the soil: Before watering, stick your finger into the soil. If it feels dry to the touch, it's time to water. If it's already damp, hold off.
Overwatering can lead to damping off, a fungal disease that can quickly wipe out your seedlings. Make sure your containers have drainage holes and avoid letting them sit in standing water.
Feeding Your Growing Green Babies
Seedlings need nutrients to grow big and strong, but they're also sensitive to over-fertilization. Start feeding them when they develop their first set of true leaves (the second set of leaves that appear).
- Use a diluted fertilizer: Mix a liquid fertilizer at half the recommended strength. Seedling fertilizer is available at most garden centers.
- Fertilize sparingly: Feed your seedlings every 2-3 weeks, or as needed. Watch for signs of nutrient deficiency, such as yellowing leaves.
- Consider compost tea: A weak compost tea can provide a gentle boost of nutrients without the risk of burning your seedlings.
Giving Them Room to Grow
As your seedlings grow, they'll need more space to spread out their roots and leaves. This is where thinning and transplanting come in.
- Thinning: If you sowed multiple seeds per cell, thin out the weaker seedlings, leaving only the strongest one. This gives the remaining seedling more room to grow.
- Transplanting: Once your seedlings have developed a few sets of true leaves and their roots are starting to fill the cell, it's time to transplant them into larger pots. This gives them more room to grow and prevents them from becoming root-bound.
- Handle with care: When transplanting, gently loosen the soil around the seedling's roots and carefully lift it out of the cell. Avoid damaging the roots as much as possible.
Troubleshooting Common Seed-Starting Hiccups
Okay, so you've got your seeds planted, and you're eagerly waiting for those little sprouts to pop up. But what happens when things don't go as planned? Don't worry, it happens to everyone! Let's tackle some common issues and get your seedlings back on track. Remember, even experienced gardeners face these challenges, so don't get discouraged. We'll figure it out together!
Dealing with Leggy Seedlings
Leggy seedlings – those tall, spindly guys – are a super common problem. They're basically stretching for more light, and it's a sign they're not getting enough. Here's what you can do:
- More Light: Move your seedlings closer to your grow lights or a sunnier window. If you're using grow lights, make sure they're only a few inches above the plants. This will help prevent them from stretching further.
- Gentle Breeze: A little air circulation can help strengthen those stems. A small fan on a low setting can do the trick. It mimics natural breezes and encourages stronger growth.
- Replant Deeper: If they're really leggy, you can carefully replant them deeper in the soil, burying some of the stem. This will encourage new root growth along the buried section and provide extra support. You can also use a seed starting mix to help give them a boost.
Leggy seedlings aren't a lost cause! With a few adjustments to their environment, you can often get them back on track and growing strong.
Battling Pesky Pests and Diseases
Ugh, pests and diseases. Nobody wants them, but they can happen. Here's how to deal:
- Good Air Circulation: Make sure your seedlings have plenty of air circulation. This helps prevent fungal diseases like damping-off, which can cause seedlings to rot at the base.
- Sterile Soil: Always use a sterile seed-starting mix. Regular garden soil can harbor pests and diseases that will harm your seedlings.
- Inspect Regularly: Keep a close eye on your seedlings for any signs of pests or disease. Look for small bugs, spots on the leaves, or wilting. Catching problems early makes them easier to solve.
- Natural Solutions: If you do find pests, try natural solutions like insecticidal soap or neem oil. Avoid harsh chemicals, especially on young seedlings.
When Seeds Just Won't Sprout
So, you planted your seeds, waited patiently, and… nothing. It's frustrating, but let's troubleshoot:
- Seed Quality: Were your seeds fresh? Seeds have an expiration date, and older seeds may not germinate as well. Always check the date on the packet.
- Moisture Levels: Did you keep the soil consistently moist? Seeds need moisture to germinate, but too much water can cause them to rot. Aim for damp, not soggy.
- Temperature: Did you provide the right temperature? Most seeds germinate best in warm soil. A heat mat can be helpful, especially in cooler climates.
- Planting Depth: Did you plant the seeds at the correct depth? Check the seed packet for instructions. Planting too deep or too shallow can prevent germination.
- Patience: Sometimes, seeds just take longer to germinate than expected. Be patient and give them a little more time. Some varieties are slower than others. If you've tried everything and still nothing, it might be time to start over with fresh seeds. It's all part of the learning process!
Getting Your Indoor Plants Ready for the Great Outdoors
The Art of Hardening Off
Okay, so you've nurtured your little seedlings indoors, and they're looking strong and healthy. Now it's time for the big move – getting them ready for life outside! But you can't just plop them into the garden and expect them to thrive. They need a little transition period, what we call "hardening off." This process gradually acclimates your plants to the harsher outdoor conditions, like direct sunlight, wind, and temperature fluctuations. Think of it as plant boot camp!
- Start by placing your seedlings outdoors in a sheltered spot for just an hour or two each day.
- Gradually increase the amount of time they spend outside over the course of a week or two.
- Protect them from strong winds and intense sunlight during this process.
Hardening off is super important because it prevents transplant shock. Without it, your plants could get sunburned, stunted, or even die. It's a little extra effort that makes a huge difference in the long run.
Knowing When It's Time to Transplant
Timing is everything! You don't want to rush the transplanting process. Wait until the danger of frost has passed in your area. Check your local weather forecast and make sure the soil has warmed up a bit. Your seedlings should also be a decent size – usually a few inches tall with several sets of true leaves.
- Check the weather forecast for any unexpected cold snaps.
- Make sure the soil is workable and not too wet.
- Look for healthy root development in your seedlings.
Making the Move to Your Outdoor Garden
Alright, the big day is here! Time to move your babies into their permanent home. Choose a cloudy day or transplant in the late afternoon to minimize stress on the plants. Dig a hole that's slightly larger than the root ball, gently remove the seedling from its container, and place it in the hole. Backfill with soil, water thoroughly, and add a layer of mulch to help retain moisture and suppress weeds. Congrats, you did it!
- Water your seedlings well before transplanting.
- Handle them gently to avoid damaging the roots.
- Space them according to the instructions on the seed packet.
Ready, Set, Grow!
So, there you have it! Starting plants from seeds indoors might seem like a big deal at first, but it's really not. It's a super rewarding way to get your hands dirty, save some cash, and grow all sorts of cool plants you might not find anywhere else. Just remember to pick the right seeds, give them a good home with enough light and water, and be patient. Before you know it, you'll have a bunch of happy little plants ready to make your home or garden look amazing. Happy growing!
Frequently Asked Questions
Why should I start seeds indoors instead of just planting them outside?
Starting seeds indoors gives your plants a head start, especially for those that take a long time to grow, like tomatoes or peppers. It also saves you money since seed packets are much cheaper than buying full-grown plants. Plus, you get to grow all sorts of unique plants you might not find at your local store.
What are the best plants for a beginner to start from seeds indoors?
For beginners, some of the easiest plants to grow from seeds indoors include lettuce, basil, marigolds, and zinnias. Tomatoes and peppers are also good choices, but they need a bit more light and warmth.
What basic supplies do I need to start seeds indoors?
You'll need seed trays or small pots, a good quality seed-starting mix (not regular garden soil), labels, and a spray bottle for watering. A grow light is also super helpful, especially if you don't have a very sunny window.
What information should I look for on a seed packet?
Seed packets are like little instruction manuals! They tell you how deep to plant the seeds, how long they'll take to sprout, and when they'll be ready to move outside. Always read them carefully before you start planting.
My seedlings aren't looking so great. What are some common problems and how can I fix them?
Leggy seedlings (tall and thin) usually mean they're not getting enough light. Try moving them closer to a window or getting a grow light. For pests, try natural solutions like soapy water or neem oil. If seeds don't sprout, check the expiration date, make sure the soil is moist, and that the temperature is right.
What does “hardening off” mean, and why is it important?
Hardening off means slowly getting your indoor plants used to outdoor conditions. You do this by putting them outside for a few hours each day, gradually increasing the time over a week or two. This helps them get strong enough to handle the sun, wind, and temperature changes outside.