
If you’re like me, you love the idea of growing new plants without spending a fortune. Starting house plants from cuttings is a simple way to clone your favorites and fill your home with greenery. You just snip a bit of a healthy stem, place it in water or soil, and wait for roots to appear. It can feel a bit nerve-wracking at first, but with basic tools, a clean workspace, and some patience, you’ll be celebrating every new sprout in no time.
Key Takeaways
- starting house plants from cuttings can save you money, space, and let you grow more of your favorite greens
- Always pick healthy stems, avoid damaged leaves, and choose plants known to root easily, like pothos or coleus
- Make a simple workspace: clean scissors, sterilize containers, use fresh water or airy potting mix to keep things tidy
- Water propagation works great in clear jars; soil propagation needs a light mix and even moisture—watch for rot
- Give your cuttings bright, indirect light, some humidity, and watch for pests; pot up roots once they reach 1–2 inches
Mastering The Art Of Starting House Plants From Cuttings
Understanding The Basics Of Propagation
So, you're thinking about diving into the world of plant propagation? Awesome! It's way easier than it sounds, and super rewarding. Basically, propagation is just a fancy word for making new plants from pieces of existing ones. Think of it like plant cloning! The most common method involves taking a cutting from a healthy plant and encouraging it to grow its own roots. It's like magic, but with a little bit of plant science thrown in.
Why Cuttings Make Sense Indoors
Why bother with cuttings when you can just buy a new plant? Well, for starters, it's a great way to expand your indoor jungle without breaking the bank. Plus, it's a fun project! Indoor environments are usually pretty stable, which makes them ideal for getting cuttings to root. You're not battling crazy weather or pests as much as you would outdoors. Plus, you get to keep a closer eye on your little plant babies. Here's why cuttings are great indoors:
- Controlled environment
- Easy monitoring
- Year-round propagation
How Cuttings Save Money And Space
Let's be real, plant collecting can get expensive, and space fills up fast! Cuttings are the ultimate solution. Instead of buying a whole new plant, you can create one from a piece of a plant you already have. It's like getting a free plant! Plus, cuttings start small, so you don't have to worry about finding room for a huge pot right away. They're perfect for small apartments or anyone who's trying to be a bit more budget-conscious.
Think of it this way: one mature plant can give you dozens of cuttings. That's dozens of new plants for the price of… well, nothing! It's a win-win for your wallet and your living space.
Choosing The Perfect Plants For Your Cutting Project
Starting new plants from cuttings is super rewarding, but picking the right plants to begin with can really set you up for success. Not all plants are created equal when it comes to propagation, so let's explore some tips to help you choose wisely and get those cuttings thriving!
Identifying Healthy Source Plants
First things first, you need a healthy "mother" plant to take cuttings from. Look for plants that are vibrant, with no signs of disease or pests. Avoid plants with yellowing leaves, spots, or any visible bugs. The stem should be sturdy, not flimsy. A healthy source plant will give you the best chance of getting a successful cutting. Think of it like this: a strong parent makes for a strong child! It's also a good idea to check the easy propagation tips for the plant you're considering to make sure it's a good candidate for cuttings.
Selecting Easy To Root Varieties
If you're new to propagation, start with plants that are known to root easily. This will boost your confidence and give you some quick wins. Some great options include:
- Pothos
- Heartleaf Philodendron
- Spider Plant
- African Violet
These plants are generally very forgiving and will root readily in water or soil. Plus, they're all super popular houseplants, so you probably already have one or two lying around! Don't be afraid to experiment, but starting with easy varieties is a smart move.
Considering Unique And Rare Species
Once you've mastered the basics, you might want to try your hand at propagating some more unique or rare species. This can be a bit more challenging, but also incredibly rewarding. Just be aware that these plants may require more specific conditions, such as higher humidity or specialized rooting hormones. Do your research before you start, and be prepared for a potentially lower success rate. But hey, even if you only get one cutting to root, you've just added a rare gem to your houseplant collection!
Propagating unique plants can be a fun way to expand your collection and impress your friends. Just remember to be patient and persistent, and don't get discouraged if things don't always go as planned. The journey is part of the fun!
Setting Up A Cutting-Friendly Workspace
Creating the right environment is key to successful propagation. Think of it as setting up a mini plant hospital – clean, organized, and ready to nurture new life! It doesn't have to be fancy, but a little preparation goes a long way.
Essential Tools And Supplies
Okay, let's gather our gear! You don't need a ton of stuff, but having the basics on hand will make the whole process smoother. Here's a quick list:
- Sharp, clean scissors or a propagation knife (sterilized, of course!).
- Small pots or containers with drainage holes.
- A good quality seed starting mix or perlite.
- Rooting hormone (optional, but it can speed things up!).
- Spray bottle for misting.
- Labels and a permanent marker to keep track of your cuttings.
Prepping A Clean, Well Lit Area
Location, location, location! Find a spot that's easy to keep clean and has good, indirect light. A kitchen counter near a window works great, or even a spare room. Avoid direct sunlight, which can scorch your delicate cuttings. A clean space minimizes the risk of infection and happy cuttings!
Think about airflow too. Stagnant air can lead to problems, so a little ventilation is a plus. A small fan on low speed can work wonders. Just don't blast your cuttings with a hurricane!
Sterilization Practices To Avoid Trouble
This is super important! Sterilizing your tools and containers prevents the spread of diseases and fungi. Nobody wants a cutting to rot before it even gets started. Here's how to keep things clean:
- Wash your scissors or knife with soap and water, then wipe them down with rubbing alcohol.
- Clean your pots or containers with a bleach solution (1 part bleach to 9 parts water).
- Use fresh seed starting mix – don't reuse old soil.
By taking these simple steps, you'll create a safe and healthy environment for your cuttings to thrive!
Soil Propagation Techniques For Robust Roots
Crafting A Fluffy Seed Starting Mix
Okay, so you're ditching the water for some good old soil propagation? Awesome choice! The key here is the mix. You can't just grab any old dirt from the backyard. Think fluffy, well-draining, and nutrient-rich. I like to whip up my own blend. It's super easy, and you know exactly what's going in there.
Here's my go-to recipe:
- 1 part peat moss (or coco coir for a more sustainable option)
- 1 part perlite (for drainage, drainage, drainage!)
- 1 part vermiculite (helps retain moisture and nutrients)
Mix it all together until it's nice and even. Moisten it before you start planting – it should be damp, not soaking wet. You're aiming for that perfect sponge-like consistency. This seed starting mix will give your cuttings the best possible start.
Planting And Maintaining Moisture Levels
Alright, you've got your mix, now it's time to get those cuttings in the ground! Make a small hole in the soil with your finger or a pencil, gently place the cutting in, and lightly pat the soil around it. Don't pack it down too tight – you want those roots to be able to breathe.
Now, the tricky part: moisture. You want to keep the soil consistently moist, but not waterlogged. Overwatering is a surefire way to invite rot and fungus, and nobody wants that. I like to use a spray bottle to mist the soil surface every day or two. You can also cover the pot with a plastic bag or humidity dome to help retain moisture. Just make sure to open it up every now and then to let in some fresh air.
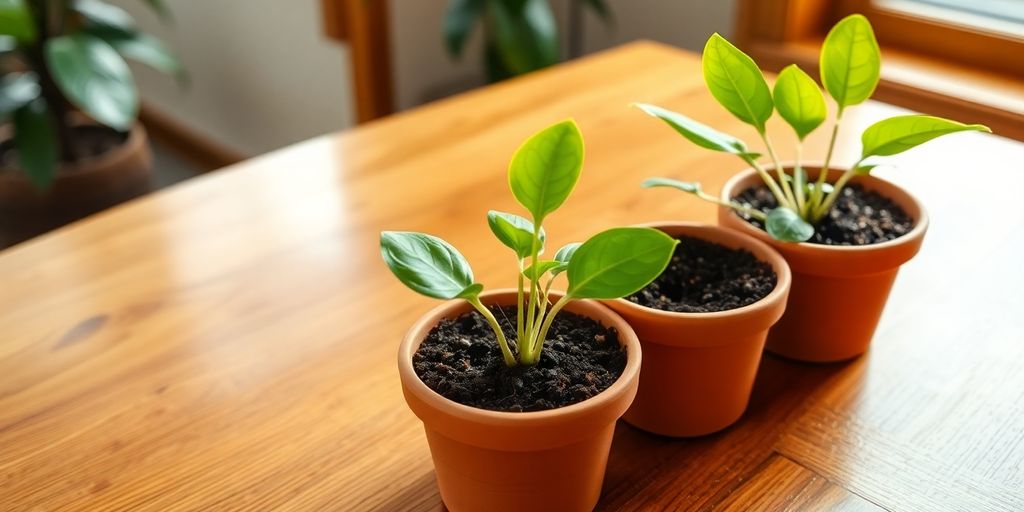
When To Pot Up Newly Rooted Cuttings
This is the exciting part! You've been patiently waiting, and now you're starting to see some action. How do you know when your cuttings are ready to move to a bigger pot? Well, gently tug on the cutting. If it resists, that means roots have formed! You can also carefully dig around the base to get a peek at the root system. You're looking for roots that are at least an inch or two long.
Once your cuttings have a good root system, it's time to pot them up into their own individual containers. Choose a pot that's only slightly larger than the root ball. Use a well-draining potting mix, and water thoroughly after planting. Keep your newly potted cuttings in a bright, indirect light location, and watch them thrive!
Don't rush this process. It's better to wait a little longer than to pot up too soon. Once they're ready, gently remove the cutting from its original container, being careful not to damage the delicate roots. Plant it in its new home, give it a good watering, and watch it grow! You've successfully propagated a new plant!
Water Propagation Hacks For Clear Success
Choosing The Right Container And Water
Okay, so you wanna try water propagation? Awesome! First things first, let's talk containers. You don't need anything fancy. An old glass jar, a vase, even a clean mason jar will do the trick. The key is to make sure it's clear so you can see those roots growing!
Here's a few things to keep in mind:
- Make sure it's clean! Nobody wants a moldy cutting.
- Wide mouth containers are easier to work with.
- Consider the size of your cutting. You don't want it swimming in a huge vase.
Now, about the water. Tap water is usually fine, but let it sit out for 24 hours so the chlorine can evaporate. Some people swear by distilled water, but honestly, I've had great success with regular tap water. Just make sure it's not super hard water.
Water propagation is super simple, but using the right container and water can really boost your success rate. It's all about creating a clean and healthy environment for those roots to thrive.
Monitoring Root Growth And Water Quality
Alright, you've got your cutting in water, now what? Patience, my friend! It can take a few weeks for roots to start showing. But don't just leave it and forget about it. Keep an eye on things.
Here's what to watch for:
- Cloudy water: Change it every few days to prevent bacteria buildup.
- Root development: You should see little nubs forming, then actual roots.
- Slimy stems: If the stem gets slimy, gently rinse it off. This can happen sometimes.
If you see any signs of rot, like black or mushy spots, trim them off immediately. You don't want that spreading! And remember, fresh water is your friend. Don't let it get gross.
Transitioning Water Begonings To Soil
So, you've got a nice little root system going. Congrats! Now it's time to move your cutting to soil. This can be a bit nerve-wracking, but don't worry, it's totally doable.
Here's how I do it:
- Choose a small pot with good drainage. You don't want to overwhelm the little guy.
- Use a well-draining potting mix. Something light and airy is best.
- Gently remove the cutting from the water and plant it in the soil.
- Water it well, but don't overdo it. Keep the soil moist, but not soggy.
For the first week or two, keep the humidity high. You can do this by covering the pot with a plastic bag or using a humidity dome. This helps the cutting adjust to its new environment. And be patient! It might take a little while for it to get established. But with a little love and care, you'll have a brand new plant in no time!
Nurturing Young Cuttings To Thrive
Balancing Light, Heat, And Humidity
Okay, so you've got roots! Awesome! Now comes the part where you help those baby plants really take off. Light, heat, and humidity are your best friends here. Think of it like creating a mini-spa for your cuttings. They need the right balance to feel pampered and grow strong. Too much direct sun can scorch them, so aim for bright, indirect light. A little warmth helps, but avoid extreme heat. And humidity? Well, cuttings love a bit of moisture in the air. Here's a few things to keep in mind:
- Use a humidifier or group plants together to increase humidity.
- Keep them away from drafty windows or vents.
- Rotate the cuttings regularly to ensure even light exposure.
Gentle Feeding And Nutrient Boosts
Once your cuttings have established roots, they'll need some food to fuel their growth. But hold on! Don't go dumping a bunch of fertilizer on them just yet. Young cuttings are delicate, and too much fertilizer can do more harm than good. Start with a very diluted solution of a balanced liquid fertilizer. I'm talking like, half the recommended strength. You can always increase it later if they seem to be doing well. Think of it as giving them a little snack, not a full Thanksgiving dinner. You can also use fresh compost to give them a boost.
Pruning Tips To Encourage Bushy Growth
Pruning might seem scary, especially when you've worked so hard to get your cuttings to root. But trust me, a little snip here and there can do wonders for encouraging bushy growth. Once your cutting has a few sets of leaves, you can pinch off the top growth. This will encourage the plant to send out side shoots, making it fuller and more compact. It's like giving your plant a haircut to help it grow better. Plus, you can even use those pruned pieces as new cuttings! It's a win-win! Here are some tips:
- Use clean, sharp scissors or pruning shears.
- Prune above a node (where a leaf or branch emerges).
- Don't be afraid to experiment! You can always prune more later.
Remember, patience is key. Don't expect your cuttings to turn into full-grown plants overnight. Just keep providing them with the right conditions, and they'll eventually thrive. And don't be discouraged if some cuttings don't make it. That's just part of the process. The important thing is to keep learning and experimenting. Happy growing!
Troubleshooting Common Propagation Hurdles
Let's face it, not every cutting is going to turn into a thriving plant. Sometimes things go wrong, and that's okay! The important thing is to learn from those experiences. Don't get discouraged if you encounter some bumps along the road. We're here to help you navigate those tricky situations and get back on track. Even seasoned propagators face challenges, so you're in good company.
Dealing With Rot And Fungus Issues
Rot and fungus are probably the biggest enemies of cuttings. They thrive in moist environments, which, unfortunately, is exactly what cuttings need to root. So, how do you strike a balance? First, make sure you're using clean tools and containers. Sterilization is key! If you see any signs of rot (black or mushy spots), act fast. Trim away the affected area with a clean knife or scissors. You might even consider dipping the cut end in a rooting hormone with fungicidal properties to help prevent further spread. Good air circulation is also important, so don't overcrowd your cuttings. Here are some tips to keep rot at bay:
- Use well-draining soil or change the water frequently.
- Ensure adequate air circulation around your cuttings.
- Remove any dead or decaying leaves promptly.
Saving Leggy Or Slow Growing Cuttings
Sometimes, cuttings get off to a slow start or become leggy (tall and spindly) due to insufficient light. Don't give up on them just yet! If your cuttings are leggy, try moving them to a brighter location or supplementing with a grow light. You can also prune them back to encourage bushier growth. For slow-growing cuttings, patience is key. Make sure they have the right conditions – adequate light, warmth, and humidity. A diluted fertilizer solution can also give them a boost, but be careful not to overdo it. Remember, easy seeds to start indoors need time to develop.
- Increase light exposure, either natural or artificial.
- Provide gentle warmth, especially during cooler months.
- Consider a very diluted fertilizer solution.
Managing Pests And Mold Early
Pests and mold can quickly derail your propagation efforts. Inspect your cuttings regularly for any signs of trouble. Common pests include aphids, spider mites, and fungus gnats. If you spot any, isolate the affected cuttings and treat them with an appropriate insecticide or horticultural oil. For mold, improve air circulation and reduce humidity. You can also try spraying the affected areas with a diluted solution of baking soda and water. Early detection and prompt action are crucial to preventing a full-blown infestation. Here's a quick checklist:
- Regularly inspect cuttings for pests or mold.
- Isolate affected cuttings immediately.
- Use appropriate treatments, such as insecticidal soap or neem oil.
Remember, propagation is a learning process. Don't be afraid to experiment and try different techniques. With a little patience and persistence, you'll be well on your way to creating a thriving indoor jungle!
## Conclusion
Starting plants from cuttings really isn’t as hard as it might seem. With a sharp pair of scissors, a bit of clean water or a pot of fresh soil, and a sunny spot, you’re all set to watch new roots pop. You’ll make mistakes—some cuttings won’t take—but that’s part of the fun. Each failed try is just a lesson for next time. Before long, you’ll have a little army of green friends growing all around your home. So go ahead, grab a stem, give it a trim, and see what happens. Your indoor jungle is waiting!
Frequently Asked Questions
What is a plant cutting?
A plant cutting is a small piece of stem or leaf you snip from a parent plant. It has at least one node (where leaves grow) so new roots can form and start a brand new plant.
How do I pick a healthy cutting for my indoor garden?
Choose a firm, green stem without spots or signs of disease. Aim for a section about 3–4 inches long, and cut just below a leaf joint using clean, sharp scissors.
Should I root my cutting in soil or water?
Both methods work well. For soil, stick the cut end into a loose seed-starting mix. For water, place it in a clear jar with clean water. Keep both options moist and in a bright spot out of direct sun.
How do I care for my cuttings while they develop roots?
Give them bright, indirect light and a humid spot. Mist the leaves now and then. If using soil, keep it just damp, not soaking wet. If using water, change it every few days to stay fresh.
What should I do if my cutting starts to rot?
Trim away any soft, dark parts of the stem. Move the cutting to fresh soil or water. Make sure it has good air flow and cut back on how much you mist or water it.
When is it time to pot up a rooted cutting?
Once roots reach about 1–2 inches long, it’s safe to move the cutting into a small pot with a light potting mix. Water it lightly, then let it rest in bright, indirect light for a week so it can adjust.