
Starting a worm bin might sound a bit weird at first, but trust me, it's a fantastic way to turn your kitchen scraps into something super useful for your plants. It's not as hard as you might think, and it's a great step toward being more eco-friendly. This guide will walk you through everything you need to know about starting a worm bin, from picking the right spot to keeping your wiggly friends happy.
Key Takeaways
- Pick a good spot for your worm bin that's easy to get to and not too sunny.
- Choose the right type of worms and set up their bedding just right.
- Feed your worms the right kinds of food scraps, and don't overdo it.
- Keep an eye on the moisture and air in your bin to prevent problems.
- Learn when and how to collect your worm castings, because that's the good stuff!
Choosing The Perfect Spot For Your Worm Bin
Alright, so you're ready to dive into the world of vermicomposting! That's awesome. But before you just plop your worm bin anywhere, let's talk about location. Think of it as finding the perfect home for your new wormy roommates. You want a spot that's easy to get to, has the right conditions, and won't cause any headaches down the road. Let's find that sweet spot!
Considering Sunlight And Shade
Finding the right balance of sun and shade is key. Too much direct sunlight can overheat your bin, which isn't good for your worms. Too much shade, and things might get a little too damp and slow down the composting process. Ideally, you're aiming for a spot that gets partial sun – maybe morning sun and afternoon shade, or vice versa. If you live in a super sunny area, you might need to monitor the moisture levels more often. It's all about finding that happy medium for your worm bin.
Accessibility Matters For Your Worm Bin
Seriously, think about how often you'll be adding stuff to your worm bin. If it's way out in the back corner of your yard, you're less likely to actually use it. You want it close enough to your kitchen or wherever you generate most of your food scraps so that tossing in those kitchen scraps is easy. Also, consider how easy it will be to check on the bin and do any necessary maintenance. You don't want to be trekking across the yard every time you need to add water or fluff the bedding.
Avoiding Common Location Mistakes
There are a few things you definitely want to avoid when choosing a spot. First, don't put it too close to your house or any wooden structures. While worm bins are generally pretty contained, you don't want to risk attracting pests closer to your home. Also, avoid areas that tend to flood or collect water. A soggy worm bin is not a happy worm bin. And finally, be mindful of your neighbors – make sure the location won't cause any issues with smells or attract unwanted attention.
Selecting The Right Worm Bin For Starting A Worm Bin
Okay, so you're ready to dive into the world of worm composting! That's awesome! One of the first things you'll need is a worm bin, and there are a bunch of options out there. Don't worry, it's not as overwhelming as it seems. Let's break down the choices so you can find the perfect home for your wiggly friends.
DIY Options For Your Worm Bin
Feeling crafty? Making your own worm bin can be a fun and budget-friendly project. You can use a plastic storage tote – just make sure it's dark-colored because worms don't like light. Drill some air holes in the lid and sides for ventilation. You'll also want to drill drainage holes in the bottom to prevent the bin from getting waterlogged. A simple DIY bin can work just as well as a fancy store-bought one, and you get the satisfaction of building it yourself!
Using Recycled Materials For Your Worm Bin
Why not give some old stuff a new life? You can totally use recycled materials to build your worm bin. An old dresser drawer, a sturdy plastic container, or even a repurposed cooler can work. Just make sure whatever you use is food-safe and clean. Line wooden bins with plastic to protect them from moisture. Repurposing materials is a great way to reduce waste and save money – it's a win-win!
Benefits Of An Open Versus Closed Worm Bin
Choosing between an open or closed bin really depends on your space and what you're hoping to get out of your worm composting experience. Open bins are super easy to access and great if you have a larger area. They allow for easy turning and aeration, which can speed up the composting process. However, they might attract more pests and can be a bit messier. Closed bins, on the other hand, keep things neater and are better if you're worried about critters or have limited space. They also help trap heat, which can also speed up composting. Here's a quick rundown:
- Open Bin Benefits:
- Easy access
- Good aeration
- Suitable for larger spaces
- Open Bin Drawbacks:
- May attract pests
- Can be messier
- Closed Bin Benefits:
- Tidy and contained
- Pest-resistant
- Good for small spaces
- Closed Bin Drawbacks:
- Less aeration
- Can overheat if not managed well
No matter what type of bin you choose, remember that the most important thing is to create a comfortable and healthy environment for your worms. Happy worms mean great compost!
Understanding The Basics Of Starting A Worm Bin
Alright, let's get down to the nitty-gritty of starting a worm bin. It might seem a little intimidating at first, but trust me, it's totally doable and super rewarding. We're talking about turning your food scraps into gardening gold with the help of some wiggly friends. How cool is that?
What Is Vermicomposting And How Does It Work?
Okay, so what exactly is vermicomposting? Simply put, it's composting with worms! Specifically, we're talking about using worms to break down your kitchen waste and turn it into nutrient-rich compost. The worms eat the scraps, and their castings (aka poop) become an amazing fertilizer for your plants. It's a natural, efficient, and eco-friendly way to recycle your food waste. You can even learn more about vermicomposting if you're curious.
The Amazing Benefits Of Starting A Worm Bin
Why should you even bother with a worm bin? Well, let me tell you, the benefits are pretty awesome:
- Reduces waste: You'll be throwing away way less food, which is great for the environment.
- Creates amazing fertilizer: Worm castings are like a superfood for your plants, making them grow bigger and stronger.
- It's educational: It's a fun way to learn about ecosystems and the natural world.
- It's therapeutic: Seriously, watching worms do their thing can be surprisingly relaxing!
Key Takeaways For Starting A Worm Bin
So, you're probably thinking, "Okay, I'm in! But what do I need to remember?" Here's the lowdown:
- Vermicomposting is using worms to compost food scraps.
- It's great for the environment and your plants.
- It's easier than you think! With a little bit of effort, you can have your own thriving worm bin and start creating amazing compost for your garden. It's a win-win for you and the planet!
Gathering And Layering Your Worm Bin Ingredients
Alright, let's dive into prepping the perfect feast for your wiggly friends! Getting the right mix of ingredients and layering them correctly is super important for a happy and productive worm bin. Think of it like making a cozy bed and a delicious buffet all in one. Let's get started!
Understanding Greens And Browns For Your Worm Bin
Okay, so what are "greens" and "browns" in the worm bin world? It's pretty simple. Greens are your nitrogen-rich materials. Think kitchen scraps like fruit and veggie peels, coffee grounds, and tea bags. Browns, on the other hand, are carbon-rich materials. These include shredded paper, cardboard, dried leaves, and coconut coir. The balance between these two is key to a healthy worm bin.
The Perfect Layering Technique For Your Worm Bin
Layering is super important! Here's a simple method that works wonders:
- Start with a base layer of browns. This helps with aeration and drainage. Aim for about 4-6 inches.
- Moisten the browns. They should be damp like a wrung-out sponge.
- Add a thin layer of greens on top. Don't overdo it – a little goes a long way.
- Cover the greens with another layer of browns. This helps to reduce odors and keep fruit flies away.
- Repeat these layers as you add more food scraps. Always finish with a layer of browns.
Taking the time to layer your worm bin properly can make a big difference. It helps to maintain the right moisture balance, reduces odors, and creates a happy environment for your worms.
What Not To Add To Your Worm Bin
While worms are pretty amazing, there are some things they just can't handle. Avoid adding:
- Meat and dairy products: These can attract pests and cause foul odors.
- Oily or greasy foods: These can suffocate your worms.
- Citrus fruits: Too acidic for the worms.
- Onions and garlic: These can be harmful to worms in large quantities.
- Processed foods: These often contain preservatives that can harm your worms.
By avoiding these items, you'll keep your worm composting system healthy and thriving!
Introducing Your Wormy Friends To Their New Home
Alright, you've prepped the bin, chosen your worms, and now it's time for the big move! This is where the magic really starts to happen. Think of it as welcoming your new roommates – only these roommates eat your garbage and turn it into garden gold. Let's make sure they settle in comfortably.
Choosing The Best Worms For Your Bin
Not all worms are created equal when it comes to vermicomposting. Red wigglers (Eisenia fetida) are the rockstars of the worm bin world. They're voracious eaters, reproduce quickly, and are generally happy in a contained environment. European nightcrawlers are another option, but they prefer a deeper bin and might not be as efficient at processing food scraps. Do your research and pick the right worms for your setup.
Preparing The Bedding For Your Worms
Before you just dump your worms in, make sure their new home is inviting! The bedding should be moist, like a wrung-out sponge. If it's too dry, they'll get dehydrated; too wet, and they could drown. Fluff the bedding to create air pockets. Some people even add a small amount of food scraps to get the microbial party started – think of it as a welcome snack. A lone banana peel or apple core will do the trick.
Gently Adding Your Worms To The Bin
Okay, deep breaths – it's moving day! Gently place your worms on top of the prepared bedding. Don't just throw everything in. They might be a little stressed from the journey, so give them a chance to burrow down on their own. A trick to help prevent worms from crawling out of a new bin is to place a few sheets of damp newspaper on top of the “soil” mound inside the bin. Go back and check the bin after a day. Ours will sometimes cluster around the lid and handle portion of the bin. Put them back under the damp newspaper.
It's not uncommon for worms to try and escape their new bin at first. They're just getting used to the environment. To help keep them in, keep the bin dark and the bedding moist. You can even leave a light on above the bin for the first few days – worms don't like light and will burrow down to escape it.
After adding your worms, resist the urge to feed them immediately. If you've prepared the bin correctly, they will have plenty to eat in their new habitat. Just give the bin a week to settle in. Keep monitoring conditions, but resist the urge to dig around to see how your worms are doing.
Maintaining A Happy And Healthy Worm Bin
Alright, you've got your worm bin set up, and your worms are settling in. Now comes the part where you keep them happy and thriving! It's not hard, but it does require a little attention. Think of it like having a low-maintenance pet – they need food, water, and a comfy home. Let's dive into the essentials.
Feeding Your Worms The Right Way
Okay, so what do worms eat? They're not too picky, but they do have preferences. Generally, they love fruit and veggie scraps. Think apple cores, banana peels, coffee grounds, and carrot tops. The key is to bury the food under the bedding; this helps prevent fruit flies and keeps things tidy. Don't overfeed them! Start with small amounts and see how quickly they munch through it. A good rule of thumb is to feed them about 2-3 times their weight per week. If you started with a pound of worms, give them 2-3 pounds of food. Also, avoid meat, dairy, oily foods, and citrus in large quantities, as these can cause problems.
Keeping Your Worm Bin Moist And Aerated
Worms need a moist environment to thrive. Think of a wrung-out sponge – damp, but not soaking wet. If the bin gets too dry, they can't breathe properly. If it's too wet, they can drown. To check the moisture, grab a handful of bedding and squeeze it. It should feel damp, and maybe a few drops of water should come out. If it's too dry, spray it with water. If it's too wet, add some dry bedding like shredded newspaper or cardboard. Aeration is also important. Worms need oxygen, just like us! Fluff up the bedding every week or two to keep the air circulating. This also helps prevent the bin from becoming anaerobic, which can lead to foul odors. Adding diverse bedding materials is crucial for successful vermicomposting.
Troubleshooting Common Worm Bin Issues
Sometimes, things can go wrong. But don't worry, most worm bin problems are easy to fix. Here are a few common issues and how to handle them:
- Smelly Bin: This usually means the bin is too wet or there's not enough aeration. Add dry bedding and fluff it up.
- Fruit Flies: Bury food scraps completely and cover with a layer of newspaper. You can also use a fruit fly trap.
- Worms Trying to Escape: This could mean the bin is too acidic, too wet, or too dry. Check the moisture level and add some crushed eggshells to balance the pH.
- Slow Decomposition: Make sure you're feeding your worms the right foods and that the bin is moist and aerated. You might also need to add more worms if the population is too small.
Remember, a little observation goes a long way. Check on your worms regularly, and they'll reward you with amazing castings for your garden!
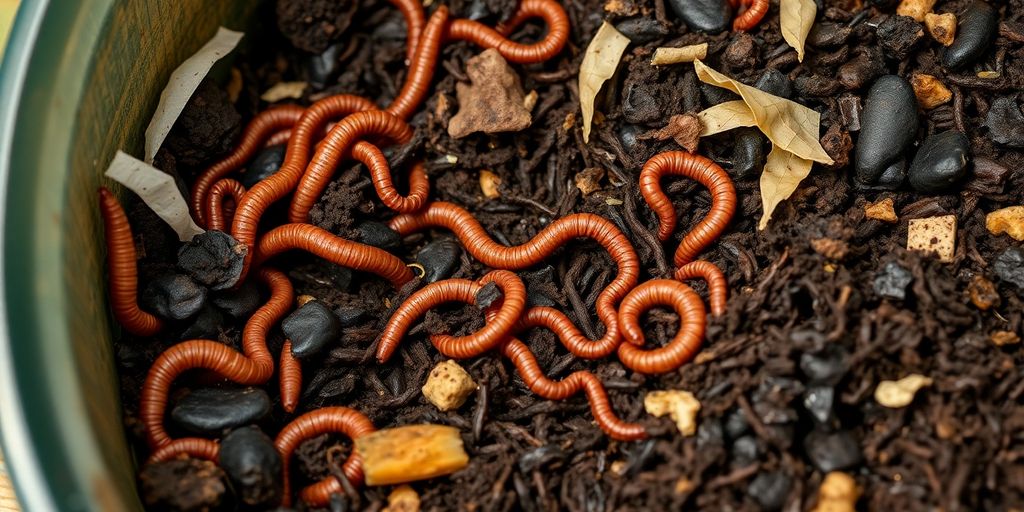
Harvesting Your Wonderful Worm Castings
Okay, so your worms have been hard at work, and now it's time to reap the rewards! Harvesting your worm castings is like finding buried treasure – nutrient-rich and ready to boost your garden. It might seem a little daunting, but trust me, it's easier than you think. Let's get into the nitty-gritty of how to get those castings and put them to good use.
When To Harvest Your Worm Castings
Knowing when to harvest is key. You'll want to harvest when your bin is mostly filled with dark, crumbly castings and there's not a lot of visible bedding left. It usually takes about 3-6 months, depending on how much you're feeding your worms and the size of your bin. A good sign is when the material at the bottom of the bin looks like really rich, dark soil. You can also tell by the smell – it should smell earthy, not sour or rotten. If it smells bad, something's off (check your moisture levels and what you're feeding them!).
Simple Methods For Harvesting Castings
There are a few ways to harvest, and here's a simple one:
- The Dump and Sort Method: Dump the contents of your bin onto a tarp in a well-lit area. Worms don't like light, so they'll burrow down. Gently scrape off the top layer of castings and set them aside. Repeat this process until you're mostly left with worms. Return the worms and some fresh bedding to the bin.
- The Migration Method: Stop feeding your worms for a week or two. Then, put all the food on one side of the bin. The worms will migrate to that side. After a week, harvest the castings from the empty side. This is a slower method, but it's less disruptive to the worms.
- The Cone Method: This is a variation of the dump and sort. Form the worm castings into a cone-shaped pile. After 10 minutes, remove the outer layers of the castings.
Harvesting can be a bit messy, so do it outside if you can. Wear gloves, and don't worry if you get a few worms in your castings – they won't hurt anything!
Using Your Nutrient-Rich Worm Castings
Now for the best part – using your castings! Worm castings are amazing for your plants. They're packed with nutrients and beneficial microbes that will help your plants thrive. Here are a few ways to use them:
- Potting Mix: Mix castings with potting soil for seedlings or houseplants.
- Side Dressing: Sprinkle castings around the base of your plants.
- Worm Tea: Soak castings in water to make a nutrient-rich liquid fertilizer.
Worm castings are a slow-release fertilizer, so you don't have to worry about burning your plants. They're also great for improving soil structure and water retention. So go ahead, give your plants a treat! They'll thank you for it.
Wrapping Things Up
So, there you have it! Starting your own worm bin might seem like a big deal at first, but it's really pretty simple. You're basically setting up a tiny, busy ecosystem right in your home or yard. It's a cool way to turn your kitchen scraps into something amazing for your plants, and you'll be doing a solid for the planet too. Just remember to keep an eye on your worms, give them the right food, and they'll do all the hard work for you. Happy worm farming!
Frequently Asked Questions
What kind of worms should I use for my worm bin?
Red wigglers are usually the best choice for a worm bin. They are super good at eating food scraps and making rich compost.
What can I feed my worms?
You can feed your worms many things like fruit and veggie scraps, coffee grounds, tea bags, and even shredded paper. Just make sure to avoid meat, dairy, oily foods, and citrus, as these can cause problems.
Where is the best place to keep my worm bin?
A worm bin should be kept in a spot that's not too hot or too cold, and out of direct sunlight. A garage, basement, or even under a sink can be good places.
How do I know when my worm castings are ready to harvest?
You'll know your worm castings are ready when the material in your bin looks dark and crumbly, like rich soil, and you can't really see the original food scraps anymore. It usually takes a few months.
Why does my worm bin smell bad?
If your worm bin smells bad, it usually means it's too wet or you've added too much food. Try adding more dry, brown materials like shredded newspaper or cardboard, and reduce how much you feed your worms for a bit.
How do I use the worm castings?
Worm castings are like super-food for your plants! You can mix them into your garden soil, use them as a top dressing for potted plants, or even make a ‘worm tea' by soaking them in water to create a liquid fertilizer.